We frequently have clients who need to have a certain modicum of modesty in their gowns.
Gowns of every variety fall in this category.
Today's blog is about one project to build up the neckline.
The gown was purchased from our sale rack for $99.00
With some modification it will be they had been looking for.
One problem was the neckline was far to open.
This is a frequent problem we overcome.
The gown had long sleeves which she wanted shortened. We removed the motifs from the old sleeves to build up the neckline. Here they are removed and are being laid out to see how to best place them.
Our girl is a very special girl with Cerebral Palsy and so it is important that the gown feel comfortable on her. With that in mind we chose sheer nylon tricot for the foundation of the re-construction of the neckline.

Then we placed the motifs on the foundation.
Of course they had to be moved around a little bit to create the frame.

Oh yes, be sure to leave seam allowance for attachment into the existing neckline.
Pinning the motifs down so we can begin sewing.
Pin it into the neckline for a 'test drive' to be sure we are placing things perfectly.

Still pinned and minor motif movement is nearly complete.
The piece is removed from the neckline to sew the lace to the foundation. All hand sewn.

Hundreds of tiny stitches that we do not want to be seen, but need to be secure are place around the edge of each motif and through the beads to assure none will fall off.
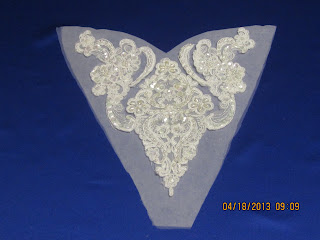
Motifs appliqued to the foundation and now the built up neckline is ready to be placed.

Carefully pining on the left side to sew in and snaps will be applied to the right side from the shoulder to the zipper.
Detail photo of the new panel pinned into place. This was also completely hand sewn into place.

We did not start taking pictures when we started this project. Nor have we taken the finished photos. We will take those tomorrow. If you will note the time lapse on the photo: the applique took about 3 hours to complete. Total time on this gown is 35 hours. Next week we will do a blog on an entirely different neckline build up.